


How to Use the BeJeweler Pro: Your Complete Beginner's Guide
Posted by Rhinestones Unlimited on May 29th 2026
A HOTFIX APPLICATOR TUTORIAL
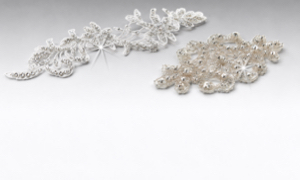
Professional sparkle, no mess.
Ready to add professional sparkle to your projects without messy glue or complicated setups? The BeJeweler Pro Hot Fix Applicator makes applying rhinestones easier than you think.
Whether you are embellishing dance costumes, customizing clothing, or adding sparkle to accessories, this tool turns what used to be a tedious process into something clean and precise. Let's walk through everything you need to know to get started.

SECTION 01 · MEET THE TOOL
What is the BeJeweler Pro?
The BeJeweler Pro is a handheld hotfix applicator, sometimes called a "hotfix wand," designed for applying hotfix rhinestones to fabric.
Instead of using glue and tweezers, the BeJeweler Pro picks up your rhinestone, heats the adhesive that is already on the back of the stone, and releases it onto your fabric. The result? Clean, professional-looking embellishments in seconds.
What makes it different.
Shortest nozzle of any hotfix tool: your hand rests on the table for precision and stability.
Ergonomic design: comfortable grip reduces hand fatigue during long projects.
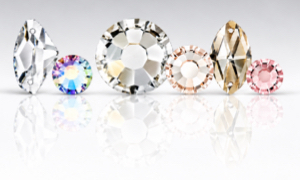
8 precision tips included: round tips for 6ss, 8ss, 10ss, 16ss, 20ss, 30ss, and 34ss, plus a Hot Spot tip that applies all shapes and sizes.
No mess: no glue bottles, no sticky fingers, no cleanup.

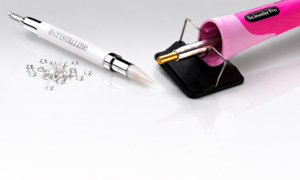
Everything included: tool, support stand, wire brush, and 8 precision tips.
What's in the box.
01
The tool itself
BeJeweler Pro wand with cord and on/off switch. Universal voltage for any country. Patented ergonomic handle.
02
8 precision tips
The kit includes round tips for 6ss, 8ss, 10ss, 16ss, 20ss, 30ss, and 34ss, plus a flat Hot Spot tip that applies all shapes and sizes. Additional tip sizes such as 12ss are available as separate replacement purchases.
03
Accessories
Support stand to keep the hot tool safe between uses. Wire cleaning brush for removing adhesive buildup. Storage box with individual compartments for each tip.
PRECISION TIP REFERENCE
Match Tip to Stone Size
|
Tip Size
|
Millimeters
|
Best For
|
|---|---|---|
| 6ss | 2 mm | Smallest stones, fine detail work |
| 8ss | 2.5 mm | Very small stones |
| 10ss | 3 mm | Small stones |
| 12ss | 3.5 mm | Small to medium stones |
| 16ss ★ | 4 mm | Most common size. Start here. |
| 20ss | 5 mm | Medium-large stones |
| 30ss | 6 mm | Large stones |
| 34ss | 7 mm | Largest standard stones |
| Hot Spot | 4 mm flat | All shapes and sizes (pearls, studs, nailheads, shaped stones) |
Kit includes the seven round tips above plus the Hot Spot tip. The 12ss tip and other replacement options are available as separate purchases.
About the Hot Spot tip: unlike the other tips, the Hot Spot tip has a flat surface instead of a cup. It applies hotfix embellishments of all shapes and sizes: pearls, metal studs, nailheads, shaped stones (hearts, stars, flowers), and any non-standard hotfix piece.
BEGINNER TIP
Start with 16ss (4 mm) rhinestones and the 16ss tip. It is the easiest size to handle and the most versatile.
SECTION 02 · IN ACTION
Watch the BeJeweler Pro at work.
Before we walk through the steps, watch this demonstration to see exactly how the BeJeweler Pro works.
Hold the tool straight down for 10 to 15 seconds to bond the rhinestone to the fabric.
SECTION 03 · THE PROCESS
How to apply hotfix stones, step by step.
The full process is four steps: heat, pick up, apply, clean. Each step has a few details that make the difference between an okay result and a professional one.
01
Setup & heating.
Choose your tip: select the tip that matches your rhinestone size. If you are using 16ss rhinestones, use the 16ss tip.
Attach the tip: screw the tip onto the end of the wand. Hand-tighten only. You do not need tools.
Heat it up:
1. Place the tool in the support stand.
2. Plug in and turn on (if your model has a switch).
3. Wait 3 to 4 minutes for the tool to fully heat.
IMPORTANT
The tool must be completely heated before use. Starting too early means the adhesive will not melt properly.
02
Pick up your rhinestone.
This is where technique matters.
The right way:
1. Hold the tool like you would hold a pen.
2. Place the tip straight down on top of the rhinestone (90-degree angle, not tilted).
3. Hold for 2 to 3 seconds until the adhesive on the stone looks wet and shiny.
4. Lift straight up.
5. Immediately turn the tool upright so the stone does not fall out.
What to look for: the adhesive should look wet and shiny. If it starts bubbling, you have held the tip there too long. Lift sooner next time.

The precision tip holds a single rhinestone while the adhesive melts.
03
Apply to fabric.
Now you are ready to place your rhinestone.
1. Position the tip over your desired spot on the fabric.
2. Press straight down (again, 90-degree angle).
3. Hold for 10 to 15 seconds. This is crucial for a strong bond.
4. Lift straight up.
5. Do not touch the rhinestone yet. Let it cool and cure.
Pro tip: the short nozzle design lets you rest your hand on the table while you work. This gives you much more control than hovering in the air.
04
Cleanup between stones.
After every few rhinestones, you will notice adhesive building up on the tip.
How to clean:
1. While the tip is still hot, use the wire brush.
2. Gently brush the inside of the tip to remove residue.
3. This keeps your pickup clean and consistent.
IMPORTANT
Only clean while hot. The adhesive is soft when heated and brushes away easily. Once it cools, it hardens.
The technique in three words: straight down, wait for shine, lift straight up.
SECTION 04 · YOUR FIRST PROJECT
Practice before you commit.
Before you start on your actual project, practice on scrap fabric. Seriously, even experienced users do this when trying a new fabric or rhinestone size.
Good first projects.
Plain t-shirt: cotton is forgiving and easy to work with.
Denim pocket: thick, stable fabric gives you confidence.
Canvas tote bag: large, flat surface for practice.
Start simple.
Use 16ss rhinestones (the easiest size to handle).
Try a small design first (your initials, a simple shape).
Space stones evenly. You can always add more later.
SECTION 05 · FABRIC GUIDE
What fabrics work best?
Hotfix rhinestones work on most fabrics, but some perform better than others.
FABRIC COMPATIBILITY GUIDE
Where Hotfix Works Best
|
Fabric
|
Works?
|
Notes
|
|---|---|---|
|
Cotton
T-shirts, jeans, denim jackets
|
✓ | Perfect. Great results. |
|
Polyester
Dance costumes, performance wear
|
✓ | Excellent for embellishment. |
|
Canvas
Bags, shoes, hats
|
✓ | Strong bond on thick material. |
|
Felt
Crafts, accessories
|
✓ | Works well. |
|
Nylon
Activewear, jackets
|
⚠ | Test first. Heat-sensitive; can melt or scorch. |
|
Lycra / Spandex
Athletic wear, dance wear
|
⚠ | Test first. Some formulations do not tolerate heat well. |
|
Silk & delicate fabrics
|
⚠ | Test first. May scorch or show heat marks. |
|
Glass, metal, wood
Non-fabric surfaces
|
× | Use E6000 adhesive instead. |
ALWAYS TEST
Apply one rhinestone to an inconspicuous area of your fabric first. Make sure it does not scorch, melt, or show heat marks before committing to your full design.
SECTION 06 · TROUBLESHOOTING
Common issues, solved.
QUICK FIX GUIDE
Problem to Solution
|
Problem
|
Quick Fix
|
|---|---|
| Rhinestone will not stick to the tip | The tool is not hot enough yet. Wait another minute or two. |
| Rhinestone keeps falling off the tip | Turn the tool upright faster after pickup. |
| The adhesive is bubbling | Holding too long during pickup. Only 2 to 3 seconds are needed. |
| Rhinestone will not stay on the fabric | Not holding long enough during application. Count to 15 while pressing down. |
| The tip is clogged with adhesive | Use the wire brush while the tip is still hot. |
SECTION 07 · CARE
Caring for finished projects.
Hotfix rhinestones are durable, but proper care keeps them looking great.
RECOMMENDED
Do this
Turn the garment inside out.
Hand wash or a gentle machine cycle.
Use cool water.
Low heat dryer only.
AVOID
Do not do this
Hot water.
High heat dryer (can re-melt adhesive).
Dry cleaning (chemicals weaken the bond).
Ironing directly over rhinestones.
Storage: store embellished items flat or folded carefully. Avoid placing heavy items on rhinestones.
SECTION 08 · TOOL MAINTENANCE
Caring for your BeJeweler Pro.

01
After every use
Clean the tip with the wire brush while still hot. Return the tool to the support stand to cool. Unplug once completely cool.
02
Storage
Keep tips organized in the storage box. Label compartments if needed (sizes can look similar). Store in a dry place. Check the cord periodically for damage.
03
When to replace tips
The tip is visibly damaged or warped. Rhinestones no longer pick up consistently. Adhesive buildup will not clean off.
Replacement tips are available individually, so you do not need to replace the entire set.
SECTION 09 · FREQUENTLY ASKED
Questions, answered.
How long does the BeJeweler Pro take to heat up?
Allow 3 to 4 minutes for the tool to fully heat. If you try to apply rhinestones too early, the adhesive will not melt properly and stones will not stick. When the tool is ready, the adhesive on a test rhinestone will turn shiny within 2 to 3 seconds.
What rhinestone size should beginners start with?
Start with 16ss (4 mm) rhinestones and the 16ss tip. This is the most versatile size, easy to handle, and works for most projects. Once you are comfortable with the timing and technique, you can experiment with smaller (10ss) or larger (20ss+) stones.
Why will my rhinestones not stick to the tip?
The most common reason is that the tool is not hot enough yet. Wait another minute or two and try again. The adhesive needs to fully melt to create the suction that holds the stone. If it still will not pick up, check that you are using the correct tip size for your rhinestones.
Can I use the BeJeweler Pro on any fabric?
It works best on cotton, polyester, canvas, and felt. Heat-sensitive fabrics like nylon, lycra, and silk should be tested first because they can scorch or melt. Avoid using it on glass, metal, wood, or plastic. For those surfaces, use E6000 adhesive with flat-back rhinestones instead.
How do I clean the tips?
Use the included wire brush while the tip is still hot. Adhesive is soft when heated and brushes away easily. Once the tip cools, the adhesive hardens and is much harder to remove. Clean after every few stones for best results.
How do I care for garments with BeJeweler-applied rhinestones?
Wait 24 hours after application before washing to let the adhesive fully cure. Turn the garment inside out, use cool water on a gentle cycle with mild detergent, and low heat only. Heat from the dryer can re-melt the adhesive and cause stones to fall off.
READY TO START
What you need to get started.
The BeJeweler Pro turns rhinestone application from tedious to enjoyable. Once you get the hang of the basic technique (straight down, wait for shine, lift straight up), you will wonder how you ever worked without it.
Everyone's first few rhinestones are a little wobbly. Practice on scrap fabric, get comfortable with the timing, and you will be creating professional-looking embellishments in no time.
Questions about getting started?
Call (952) 848-0133 · Email our team
We are here to help you succeed.